
1. Before you start
Deploy a published image using the supplied configuration files. Complete the checks below before downloading the files.
Deploy the web application with Caddy for HTTPS, Soketi for signaling, and coturn for STUN/TURN. The stack also runs the share server for one-time links and the relay for the SSH agent. You do not need an Online Services subscription. Use manual vault backups with this setup; it does not include managed backups.
Prepare your server and domain
- Provision an Ubuntu 24.04 LTS server with a public IPv4 address. Sign in with an unprivileged user that has administrator access through
sudo. - Install Docker Engine and the Compose plugin,
curl, and OpenSSL. Verify withdocker compose version. Confirm your user can run Docker before continuing. - Choose a domain you can edit and locate the server's firewall settings. Ports
80,443, and5349must not already belong to another service. - Set aside two devices for the final test. Connect one to your home network and the other to mobile data.
Use the recommended TLS TURN setup below. It encrypts the connection between each client and coturn on TCP 5349. Vault synchronization is also end-to-end encrypted between devices. Use the regular TURN alternative in step 5 only if you deliberately want a setup without TURN TLS. Run these steps on Linux, not Docker Desktop, and keep coturn's host networking enabled.
2. Get the deployment files
Choose a release tag or commit from the releases and replace the placeholder below before running these commands on the VPS. Inspect the files in the deployment directory if needed. Use the same release for the configuration files and the image.
# Stop this block if any command fails, without closing your terminal
(
set -e
# Create a directory for this deployment
mkdir -p cryptex-self-hosted
cd cryptex-self-hosted
# Replace this placeholder before running the download loop
RELEASE=REPLACE_WITH_RELEASE_TAG_OR_COMMIT
# Download the configuration templates and certificate hook from the same release
for file in compose.yaml Caddyfile .env.example turnserver.conf.example deploy-turn-certificate.sh; do
curl --fail --show-error --location --output "$file" \
"https://raw.githubusercontent.com/CryptexIndustries/vault-web/$RELEASE/deploy/self-hosting/$file" || {
echo "Download failed: $file. Check the release and connection before continuing." >&2
exit 1
}
done
echo "All deployment files downloaded."
) && cd cryptex-self-hostedContinue only after you see "All deployment files downloaded." If a download fails, check the release and connection, then rerun the block from the same directory.
Prepare your local settings and generate four separate credentials:
# Create editable configuration files
cp .env.example .env
cp turnserver.conf.example turnserver.conf
# Allow only the owner to read and write these files
chmod 600 .env turnserver.conf
# Copy this output into SOKETI_APP_KEY in .env
openssl rand -hex 32
# Copy this output into SOKETI_APP_SECRET in .env
openssl rand -hex 32
# Copy this output after your username in turnserver.conf
openssl rand -hex 32
# Copy this output into RELAY_ACCESS_TOKEN in .env
openssl rand -hex 32Use the four generated values for the Soketi key, Soketi secret, TURN password, and SSH agent relay access token respectively. Do not reuse the example placeholders. The real .env and turnserver.conf files contain credentials and must remain outside the web application's public directory.
3. Set DNS and open the firewall
Create these DNS-only A records pointing to the VPS's public IPv4 address. Replace example.com with your domain. Do not publish AAAA records for this IPv4-only setup or put these names behind a CDN proxy.
| DNS name | Purpose |
|---|---|
vault.example.com | Web application over HTTPS |
signal.example.com | Secure WebSocket signaling through Caddy |
turn.example.com | TURN TLS and certificate validation |
Allow these inbound ports in both the VPS provider's firewall and the host firewall. Secure SSH using Ubuntu’s OpenSSH guide and configure the host firewall using Ubuntu’s UFW guide. Verify a second SSH session works before closing the first or changing access rules. Follow Docker’s UFW guidance: published container ports can bypass UFW. Use the provider firewall to enforce the public allowlist.
| Port | Protocol | Purpose |
|---|---|---|
80 | TCP | Certificate issuance and HTTPS redirect |
443 | TCP | Web application and signaling |
5349 | TCP | Recommended TURN over TLS |
3478 | UDP and TCP | Optional STUN and regular TURN only |
49160-49260 | UDP | TURN relay allocations |
Leave 3478 closed for the TLS-only setup. Keep the UDP relay range open even when clients connect over TLS. Allow outbound DNS, HTTPS, and traffic to peers on arbitrary UDP ports. Do not expose ports 3000 or 6001. Caddy reaches those services over the private Docker network.
4. Fill in two configuration files
Environment settings
Edit .env. Set VAULT_DOMAIN, SIGNAL_DOMAIN, TURN_DOMAIN, and ACME_EMAIL. Leave SOKETI_APP_ID=cryptex-self-hosted and replace SOKETI_APP_KEY and SOKETI_APP_SECRET with your generated values. Set VAULT_IMAGE to ghcr.io/cryptexindustries/vault-web@sha256:YOUR_VERIFIED_DIGEST and SHARE_IMAGE to ghcr.io/cryptexindustries/vault-web/share-server@sha256:YOUR_VERIFIED_DIGEST, and RELAY_IMAGE to ghcr.io/cryptexindustries/vault-web/relay-server@sha256:YOUR_VERIFIED_DIGEST. The share server and the relay have their own releases, tagged share-server-v* and relay-server-v*. Resolve all three digests from the published images. Use the command below. Leave COMPOSE_FILE commented out. Replace SHARE_CREATION_TOKENS with one openssl rand -hex 32 value per person who may create one-time share links, separated by commas.
# Replace the tag with the release you chose in step 2
docker buildx imagetools inspect ghcr.io/cryptexindustries/vault-web:YOUR_PUBLISHED_TAG
# Copy the top-level Digest into VAULT_IMAGE in .env
# VAULT_IMAGE=ghcr.io/cryptexindustries/vault-web@sha256:YOUR_VERIFIED_DIGEST
# Same for the share server release you chose
docker buildx imagetools inspect ghcr.io/cryptexindustries/vault-web/share-server:YOUR_SHARE_SERVER_TAG
# SHARE_IMAGE=ghcr.io/cryptexindustries/vault-web/share-server@sha256:YOUR_VERIFIED_DIGEST
# Same for the relay release you chose
docker buildx imagetools inspect ghcr.io/cryptexindustries/vault-web/relay-server:YOUR_RELAY_SERVER_TAG
# RELAY_IMAGE=ghcr.io/cryptexindustries/vault-web/relay-server@sha256:YOUR_VERIFIED_DIGESTUse the top-level manifest digest. This pins the image contents even if its tag changes. It does not verify that the publisher or image is trustworthy. The supplied Caddy, Soketi, and coturn images are already pinned. See Docker's image digest guide.
Leave NEXT_PUBLIC_CLOUD_ENABLED=false and SOKETI_DEFAULT_APP_ENABLE_CLIENT_MESSAGES=true in the Compose file. These settings disable the account backend and allow device-linking messages. Enter the Soketi app secret in the client at step 6; you do not need to deploy a separate authentication API.
TURN settings
Set TURN_DOMAIN=turn.example.com in .env, using your own hostname. Use that same name for the certificate, coturn's realm, and the client URL.
In .env, set TURN_UID and TURN_GID to the output of id -u and id -g for the unprivileged user who owns the configuration file. This lets coturn read the protected file without running as root.
Edit turnserver.conf. Set realm and server-name to turn.example.com. Replace the password in user=REPLACE_WITH_USERNAME:REPLACE_WITH_RANDOM_HEX. Choose your own username and replace both placeholders. Use those same credentials in the client.
Run ip -4 addr. Set listening-ip and relay-ip to the VPS interface address. If the provider assigns a private interface address behind a public IP, also set external-ip=PUBLIC_IPV4/PRIVATE_INTERFACE_IPV4. That NAT must forward the listener and relay ports without changing their port numbers.
Keep the template's authentication, blocked peer ranges, allocation limits, and bandwidth limits enabled. Share TURN credentials only with the devices using your deployment.
5. Start the services
TLS encrypts the connection to coturn and requires a trusted certificate. Regular TURN skips certificate setup. Vault synchronization remains end-to-end encrypted with either option.
From the directory cryptex-self-hosted, start the web application and signaling first. Leave coturn stopped until its certificate is installed.
# Install Certbot on the Ubuntu host
sudo apt update
sudo apt install -y certbot
# Prepare the HTTP challenge directory and protected certificate directory
sudo install -d -m 0755 /var/lib/cryptex-acme
# Use the same group ID you set as TURN_GID in .env
sudo install -d -o root -g "$(id -g)" -m 0750 /etc/cryptex-turn/tls
# Validate settings without printing credentials
docker compose config --quiet
docker compose pull
# Start HTTPS and signaling; coturn starts after certificate installation
docker compose up -d --no-build web soketi caddyObtain and install the TURN certificate
Confirm the TURN_DOMAIN DNS record points to this server and TCP 80 is reachable. Replace the hostname and email below. Certbot uses Caddy's HTTP challenge route, so it does not need to stop Caddy or take over its ports.
# Request a trusted certificate for your TURN hostname
sudo certbot certonly --webroot -w /var/lib/cryptex-acme \
--cert-name cryptex-turn -d turn.example.com \
--email [email protected] --agree-tos --non-interactive
# Review the supplied hook, then install it as root-owned
sudo install -d -m 0755 /etc/letsencrypt/renewal-hooks/deploy
sudo install -o root -g root -m 0755 deploy-turn-certificate.sh \
/etc/letsencrypt/renewal-hooks/deploy/cryptex-turn
# Copy the first certificate and key into coturn's protected directory
sudo env RENEWED_LINEAGE=/etc/letsencrypt/live/cryptex-turn \
/etc/letsencrypt/renewal-hooks/deploy/cryptex-turn
# Start coturn and inspect the TLS listener logs
docker compose up -d --no-build coturn
docker compose ps
docker compose logs --tail=100 coturnKeep the template's cert, pkey, and tls-listening-port=5349 settings. Do not add no-tls. Compose mounts the certificate directory read-only; the private key is readable only by root and coturn's configured group. Do not copy private keys into the repository or make them world-readable.
Enable renewal and check TLS
# Enable Ubuntu's scheduled Certbot renewal
sudo systemctl enable --now certbot.timer
sudo systemctl status certbot.timer --no-pager
# Test renewal and the deploy hook using the active certificate
sudo certbot renew --cert-name cryptex-turn --dry-run --run-deploy-hooks
# Check certificate trust and hostname; replace both hostnames
openssl s_client -connect turn.example.com:5349 \
-servername turn.example.com -verify_hostname turn.example.com \
-verify_return_error </dev/nullExpect Verify return code: 0 (ok) and no certificate errors. After each successful renewal, the hook copies the new certificate and sends SIGUSR2 to coturn. It reloads the certificate without restarting or closing existing connections. Check journalctl -u certbot.service if renewal fails. Caddy separately renews the web and signaling certificates. See Certbot's renewal documentation.
Check that all containers stay running and the web service reports healthy. Open your web application:
curl -I https://vault.example.com/appDo not point turns: at Caddy's HTTPS port. TURN is not HTTP. Using TLS TURN on 443 requires a separate public IP or a purpose-built TCP routing setup. This guide keeps coturn on 5349.
6. Add the servers in Cryptex Vault
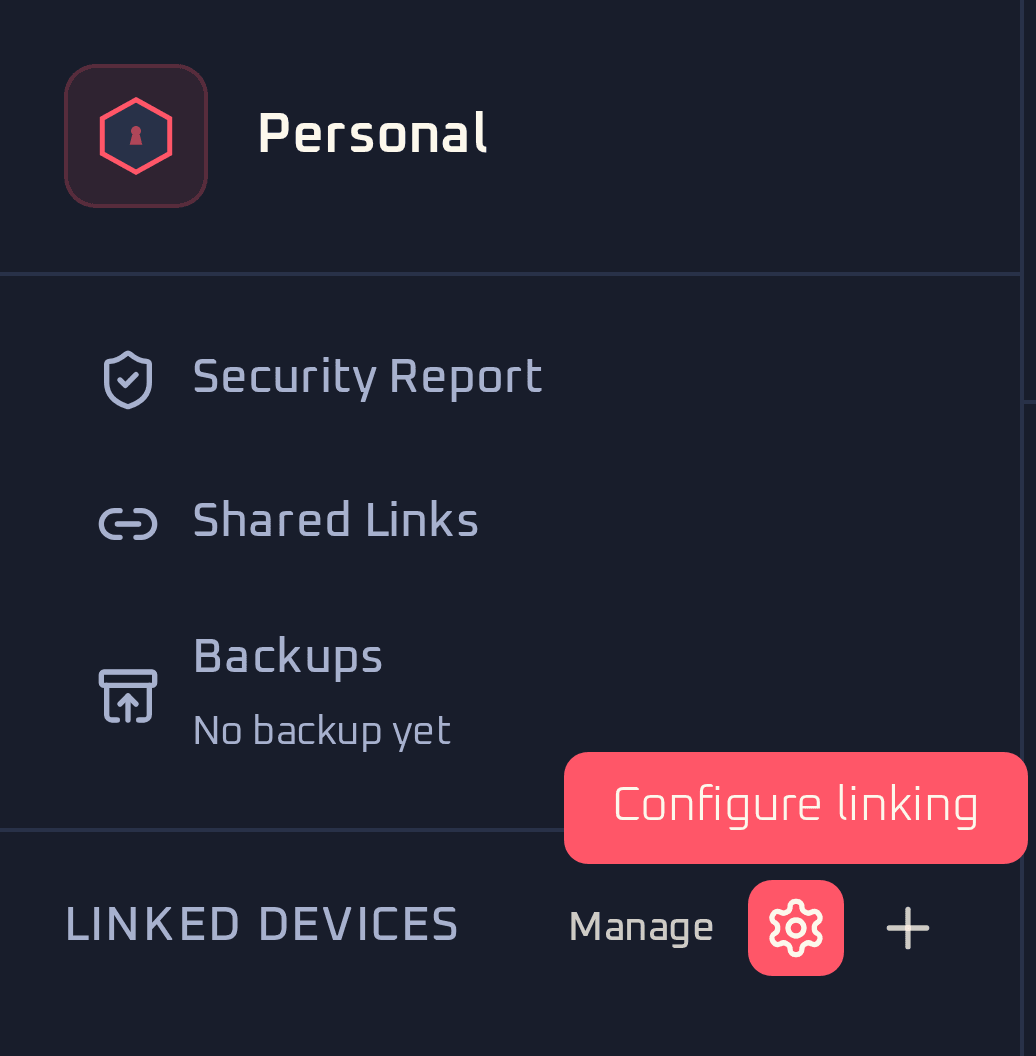
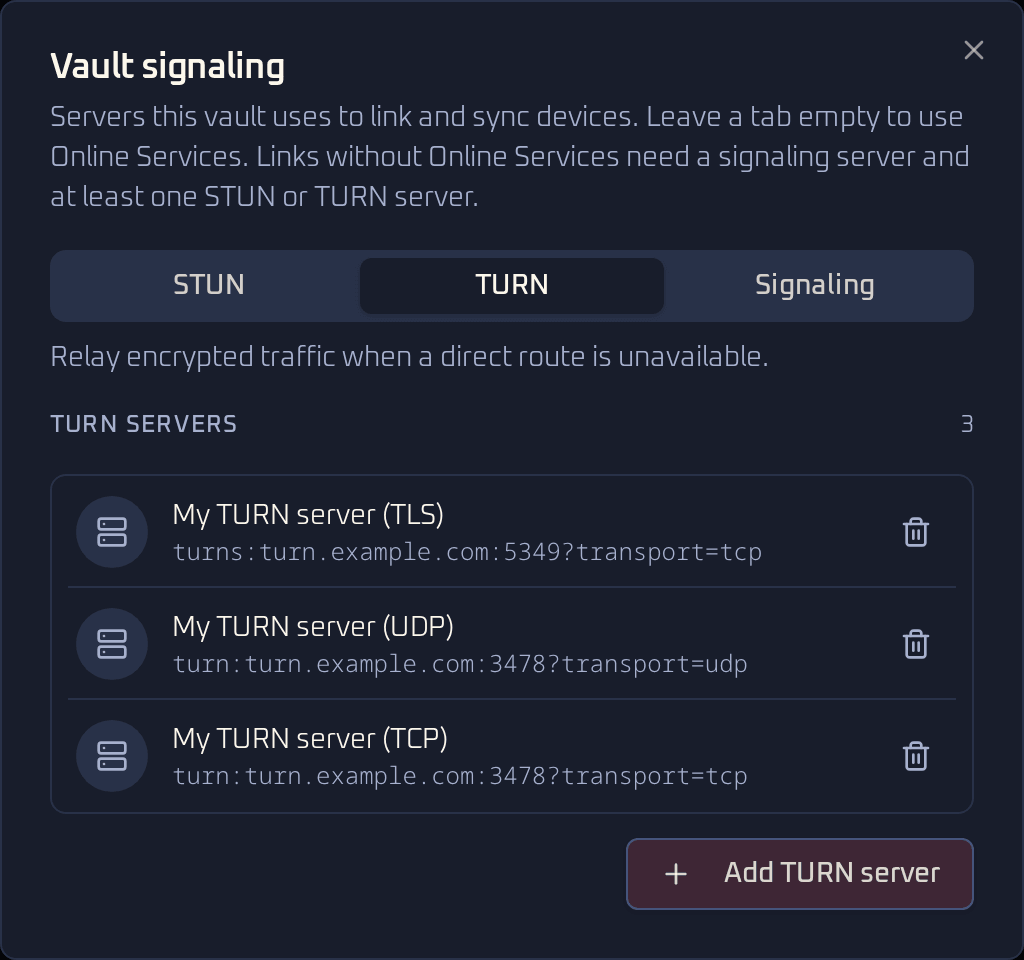
In the sending vault, select the gear beside Linked Devices to open Vault signaling. It has a tab for each server type. On each tab, choose the add button, such as Add TURN server, fill in the fields below and choose Save server. Each server is saved in the vault on its own.
 View full size
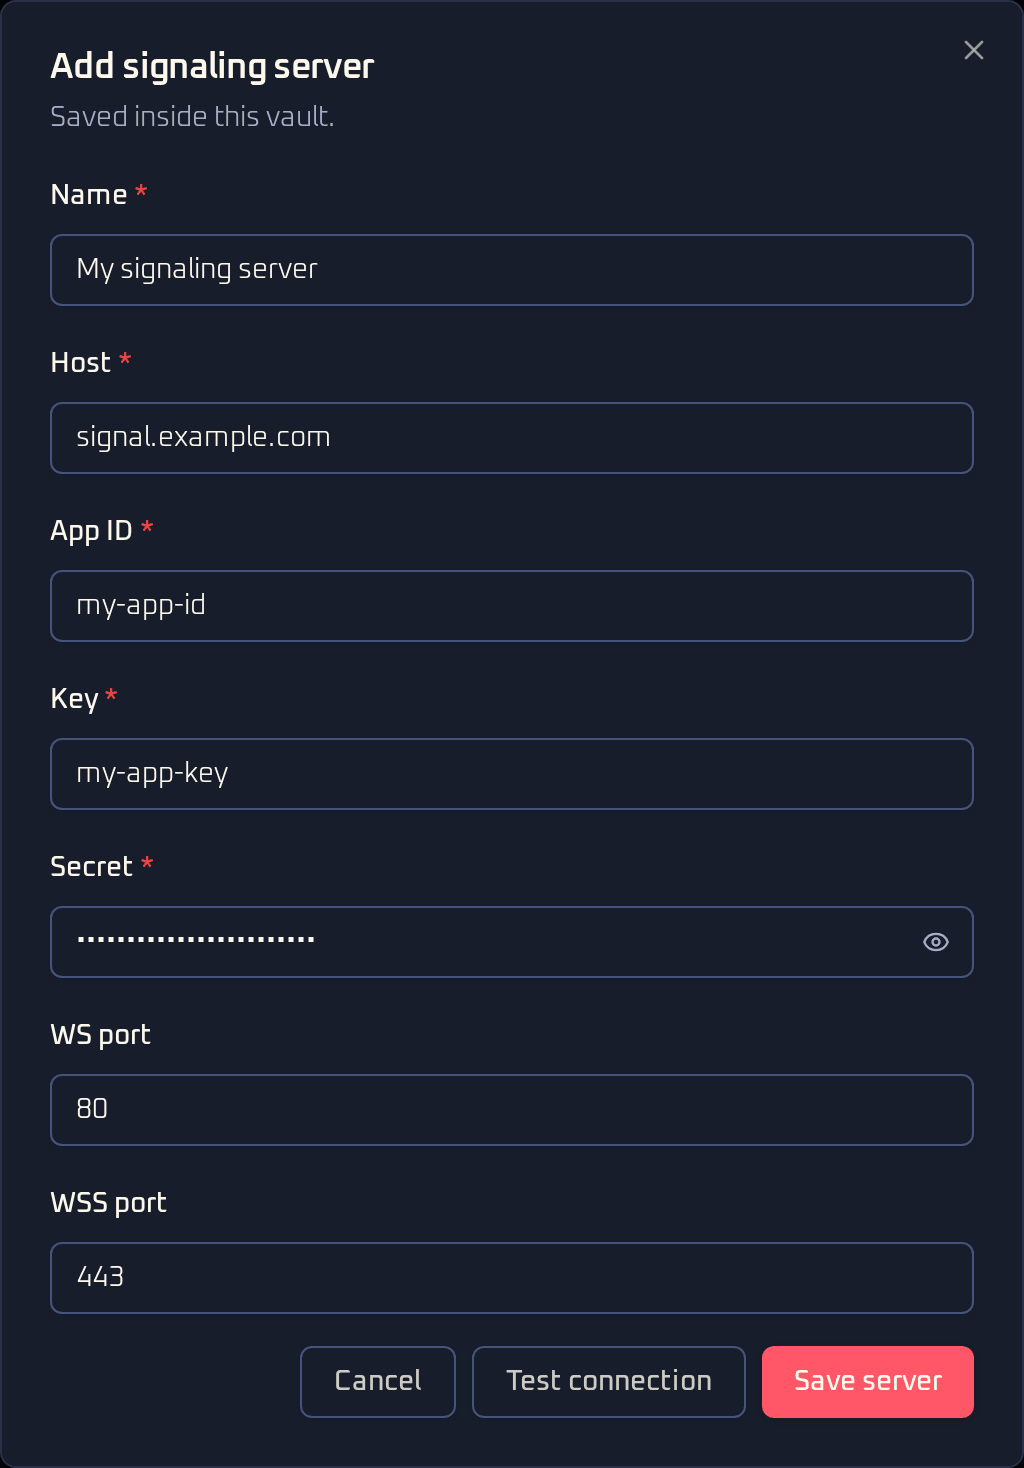
Names are labels of your choice, and each name can be used once per tab. The signaling Host is only the host name, without https://, wss://, a port or a path. Put an IPv6 address in brackets, like [2001:db8::1]. STUN accepts a host and port or a stun: or stuns: URL. TURN accepts a host and port or a full turn: or turns: URL.
Add your signaling server
 View full size
| Field | Enter |
|---|---|
| Name | A label such as My signaling server |
| Host | signal.example.com |
| App ID | Your SOKETI_APP_ID |
| Key | Your SOKETI_APP_KEY |
| Secret | Your SOKETI_APP_SECRET |
| WS port | 80 |
| WSS port | 443, which enables TLS. Enter 0 or leave it empty to turn WSS off |
Before you save, choose Test connection to check the server from this browser. For signaling, the test connects and signs in to a presence channel with your key and secret. For TURN, it asks the relay for an address with your username and password. For STUN, it waits for the server to report your public address.
 View full size
Before you delete a server that a linked device uses, the dialog names that device. It may stop syncing until you choose another server for it.
Close the dialog, start linking a device and expand Advanced connection. Select the custom signaling server and the TLS TURN entry for the link. Leave STUN unselected for the TLS-only setup. For regular TURN, select the two alternative TURN entries and optionally the STUN entry. With Online Services disabled, a custom TURN selection is required. Complete the linking flow. The encrypted invitation carries the server configuration to the receiver.
7. Test the complete connection
- Use two devices on different networks, such as home Wi-Fi and mobile data. Keep both vaults unlocked and online.
- Create a test entry on one device and synchronize. Confirm it appears on the other, then edit it there and synchronize back.
- In the web app, open Vault signaling, select a TURN entry and choose Test connection. Look for TURN relay allocation succeeded. Test the TLS entry for the recommended setup. For regular TURN, test the UDP and TCP entries one at a time. Repeat on your other network.
A successful TURN test means the relay gave this device a relay address. It does not prove data can pass between two devices through that relay. Complete the synchronization test above as well; a direct connection alone does not verify the relay data path.
9. Run the SSH agent relay
The stack includes the relay for the SSH agent. It carries encrypted signing requests between cryptex-agent on a Linux machine and the device that approves them. Caddy sends /v1/connect, /v1/pair and /v1/revoke on your vault domain to the relay, so its URL is https://vault.example.com and it needs no extra domain or firewall rule. The relay can't read requests or sign anything. It keeps the public keys of paired agents and devices in a SQLite file in the relay_data volume.
- On the Linux machine, pair with your relay instead of the hosted one:
cryptex-agent pair --relay https://vault.example.com. Use exactlyhttps://and yourVAULT_DOMAIN: sign-ins are checked against that address. The agent and the apps accept a relay only overhttps://, which Caddy already provides. Plainhttp://works only for a relay on the same machine. - When the Android app or the web app reads the code, it asks for the relay's access token. Enter your
RELAY_ACCESS_TOKEN. Each device saves it in the vault for that device only, under Agent relays.
Anyone with the token can pair agents with this relay, up to RELAY_MAX_AGENTS agents on the whole relay, 25 by default. Give it only to people you trust. To change it, edit RELAY_ACCESS_TOKEN in .env, run docker compose up -d --force-recreate relay, update the token under Agent relays on each approving device, and pair every agent again with cryptex-agent pair --force. Agents keep the token they were paired with.
Back up relay_data with Caddy's volume. If it is lost, every agent has to pair again. To revoke an agent on this relay, use the device that approves it or run cryptex-agent unpair on the machine.
The relay serves Prometheus metrics on port 9090, which isn't published. Set RELAY_METRICS_ADDR=off to turn them off. To update it, pin the digest of a newer relay-server-v* release in RELAY_IMAGE, run docker compose pull relay and docker compose up -d --no-build relay. The relay threat model describes what it stores and checks.
10. Maintain the deployment
Update and roll back
Export a vault backup first. Record the current VAULT_IMAGE value, then replace its digest in .env with the verified digest of the new published version using the command in step 4. Review that release's configuration changes before updating. Keep your existing credentials.
# Validate settings, then pull the new pinned image
docker compose config --quiet
docker compose pull web
# Replace only the web container and check its status
docker compose up -d --no-build web
docker compose psTo roll back the client, restore its previous image reference in .env and run docker compose up -d --no-build web. Keep that old image until verification is complete. Image rollback does not undo changes to browser vault data.
Review upstream security updates for Soketi, coturn, and Caddy. Update one image reference and its digest at a time in compose.yaml, pull that service, and recreate it. Repeat the linking and relay tests. Store a protected copy of your configuration and back up Caddy's certificate volume.
When something fails
- No HTTPS
- Check DNS
Arecords, remove staleAAAArecords, check ports80and443, and inspect Caddy logs for certificate errors. - Signaling fails
- Check the Host and WSS port, the key and secret, and Soketi logs. Confirm client messages are enabled. The public proxy must pass
/app/*WebSocket requests. - No relay candidate
- Check the TURN username/password, inbound TCP
5349for TLS or UDP/TCP3478for regular TURN and UDP49160-49260, outbound UDP, and the public/private IP mapping. A running container or a STUN response does not prove relay traffic works. - Works only on some networks
- Check TCP
5349for TLS TURN, or test UDP and TCP3478for regular TURN. Networks restricted to443may block this setup. - No vault after moving hosts
- The new origin has separate browser storage. Restore an encrypted backup or link from a device that still has the vault.
Configuration references: Caddy HTTPS, Soketi, and coturn options. For application errors, use the troubleshooting guide.